
Three Steps to Repair Water-Damaged Drywall
Water damage can wreak havoc on a home, destroying furniture, flooring, and appliances. It may not even spare the drywall. Water-damaged drywall can lead to various problems, including holes and cracks in the drywall, swelling and buckling of the drywall, and mold and mildew growth. Thus, it becomes essential to address these problems promptly through professional water damage restoration services to mitigate further damage and restore the home to its pre-damaged state.
Quick action is essential to prevent the drywall from losing its structural integrity and compromising the overall safety of the property. Here’s a detailed guide on how to repair water-damaged drywall and protect the property from further deterioration.
Common Signs of Drywall Water Damage
It’s important to ensure the drywall has truly suffered damage before spending resources to repair it. Drywall may exhibit any of the following signs of water damage:
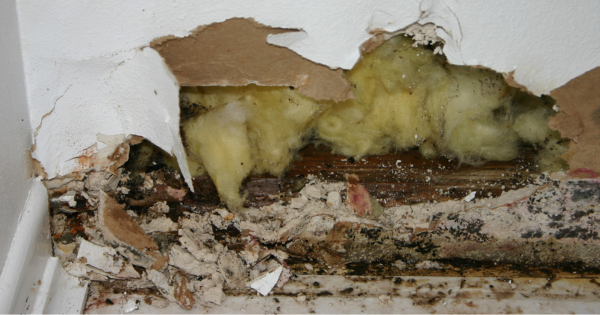
- Water stain and discoloration: Water-damaged walls usually lose their original color and develop unsightly stains. Wet areas will appear darker than other parts of the wall. Slow water leaks will result in water stains, which appear as irregularly shaped brown or yellow spots.
- Bubbles: When water gets to the wall from behind, it forces the paint or wallpaper to bubble up from the drywall.
- Peeling paint or wallpaper: Moisture can weaken the paint or the adhesive on the wallpaper. The paint or wallpaper will end up peeling off the drywall.
- Sagging walls: If the damage involves large amounts of water, it can severely weaken the drywall and make it buckle, sag, or crumble.
How to Fix Water-Damaged Drywall
Leaving water-damaged drywall unaddressed would only aggravate the problem. Luckily, repairing water-damaged drywall is quite easy if left to water damage professionals. It entails the following easy-to-follow steps.
Step 1: Clearing the Area
To clear the area, you should:
- Remove water-soaked items, including wet carpets and padding.
- Switch the circuit breakers off and remove non-damaged electrical outlets before stripping off the wall material. Any flooded outlets should be removed and discarded.
- Assess the drywall and decide how much to cut out. If the water level didn’t rise past 2.5 feet, remove the drywall material up to four feet. If the water level went beyond 2.5 feet, remove the material up to eight feet or the ceiling junction.
- Eliminate any sagging, cracked, or crumbling drywall. Drying the drywall can be an option if it’s just damp and the offending water was clean.
Step 2: Cutting the Damaged Portion of the Drywall
Follow these steps to cut out the damaged portion properly before replacing it:
- Use a chalk line to draw a straight line along the drywall above the area where the water ceased wicking.
- Use a utility knife to cut along the line at about three-quarters of the way through the wall’s thickness.
- Carefully loosen and rip off the damaged portion.
- After cutting out and removing the drywall, strip off all the insulation. If you have foam plastic, however, you may not need to remove it since it dries easily.
- After removing the water-damaged drywall, open the doors and windows and use high-efficiency blowers and dehumidifiers to dry the area around and inside the drywall.
Step 3: Replacing Water-Damaged Drywall
After clearing the area and cutting the damaged part off, it’s time to install new drywall. Start by measuring the size of the damaged area to determine the size of drywall to cut out from a new sheet. Attach four drywall clips around the damaged portion, securing each with a drywall crew.
Next, insert the pieces of drywall and secure them to the clips. Avoid tightening the screws too much. Blend the new sheet in with the old drywall using drywall tape and joint compound.
Last but not least, sand the repaired area multiple times for a smooth, seamless surface. Apply primer on the wall to seal the surface. Next, paint the whole wall and ensure uniform color throughout. Make certain the joint compound is properly dry because it contains plenty of moisture that would compromise the painting results.
For Professional Drywall Water Damage Repair, Call A.W. Puma Restoration & Remodeling!
While repairing water-damaged drywall is not very complex, it requires experience, the right techniques, and proper equipment. Otherwise, the outcome may leave a lot to be desired.
It’s best to leave such a delicate task to an experienced professional. A.W. Puma Restoration & Remodeling is the go-to contractor for professional water damage restoration and drywall repair services. The award-winning company uses professional equipment to quickly and efficiently dry and repair drywalls.
Give A.W. Puma Restoration & Remodeling a call at (508) 300-9747 or fill out their online form to request a quote for water-damaged drywall repair today! Let them assist with your needs.


